Wednesday, 31 October 2012

Unity Models

 
These are a collection of other things I have created in 3DS Max for my unity project.
 
A palm tree with altered texture to make the trunk darker and the leaves brighter.
 

A futurustic sphere. 


A space/moon rock.


A Black star with green highlights.


A spikey space rock.


A spaceship/futurisic home.


Tentacles


In this file I created an alien, mapping the extrusion to different lines I had draw to create his tentacles. I also used this to create lone tentacles and ready for movement/animation. I also used bones to create the movement and structure.


Church

 
This Church was created similarly to the enterprise, using reference images to get the right shape. The Chuch was designed to be very low poly. I used multi-subobject level to add the different textures, for textureing I also used UVWmaps, resized and rotated different texture to get the right look.


Starship Enterprise

 
To make the enterprise I took 3 reference images we were provided with and used photoshop and 3DSMax to make 3 comparitive reference view for making the 3D model.
After creating the model by reshaping, extruding and using different modifiers, I used multi-subobject materials to create the different colours of the ship.


Asteroid Animation

This is a texture animation of an asteroid I made in 3D Max with a bump texture and a modifier which gave a wave effect.

http://www.youtube.com/watch?v=6GjlRQRuPlc&feature=plcp


Snowman Animation

This snowmen I built in 3DS Max using objects we were each provided with. After putting the Snowman together I gave it an animation.

http://www.youtube.com/watch?v=tBH73VLwVTI&feature=plcp


Tuesday, 30 October 2012

Week 3 Sketches


In week 3 I decided to make my drawings a bit happier . I first drew 2 kinder toys of a lion cub and a motor bike.


I then drew a spinning top that I got from a kinder egg. I exaggerated the perspective though that did cause the perspective to be a little off.

In this drawing I decided to draw a character draft, loosely inspired by the Mega Man or Kamen Rider series. I made his hand come out toward the viewer and gave him armour, as well as a strange energy coming from his hands and a scalf flowing behind him.


 I traced over him in pen to caputure the shape, erased the underlying pencil and used pencil to start adding tone.


I finished all the colour and shading however the pencil got overexposed in the scan.
In the top left you can also see another drawing of a blackstar as in my week 1 drawing.


Week 2 Sketches


My Sketches on the second week followed a Halloween/horror theme.

This first drawing is a pen drawing of a halloween skull that I decided to buy and to draw.


The next drawing is of a death slide I decided to draw from a slide reference photo. I did a few perspective and shape guide lines in pencil and drew the rest in pen. I did shading and kept the shapes mostly simple.


I then used strong black and red pens to create heavy areas of shadow and to make the blood in the scene stand out.


Life/Perspective Drawing 2


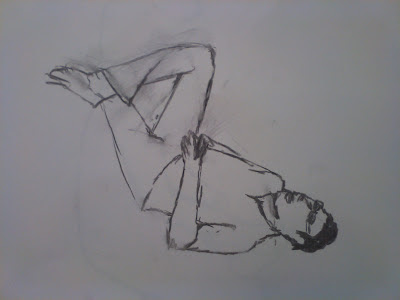
In the second life drawing lesson I started off by drawing a set of boxes, we did this to learn capturing perspective and shape from the eye. I then went on to draw different classmates as they posed for the rest of the class.


These first draing were of random positions and 2 minutes each, my drawing got better as I got more into it.


This drawing I spent 30-40 minutes on, measuring each aspect to capture the correct proportions.


I used the same method of measuring with this drawing, which I spent roughly half an hour on.


Sunday, 21 October 2012

Unity Scene One


In Unity I have created a 3D environment with water, a sky, trees, mountains, grass and different textures.


In this environment there is on screen text to inform the player of what they have to do.
There are also two particle system set to create fire once the player has collected a matchbox and walked over to the fire to start it. There are also colliders on the buildings and the fire. The building is set up so the door opens and closes, with 4 batteries needed to open it, as well as an on screen graphic to signify how close you are to collecting all the batteries.


Saturday, 13 October 2012

Life/Perspective Drawing


I have done a technical perspective drawing of a gun using a reference shape and I have also done a collaborative observational drawing of a skeleton and my own observational drawing of a skeleton's ribs.

This gun I drew in two point perspective with a vanishing point on the right and left, the one on the right goes off the page.

This skeleton was drawn in life drawing with charcoal. We each had two minutes to draw part of the skeleton in the middle of the room, we then moved around to the next person's drawing and carried on with it/edited it for another two minutes. We carried on with this until we had been around the room.


This was an accurate hour-long charcoal drawing. The vertibrates and rib bones were accurately counted and drawn, after which I added tone.


Kit Kat Mug & Chickpea Can


A chick pea can was created using texturing, in a similar way to the mug.


This Kit Kat mug I created from a reference KitKat mug object, this follows the size and shape.

I created a cylinder and extruded it into a cup. I created the handle using extrude and bevel and then bridged the two halves together. I used turbosmooth and moved edged to get the right cup shape.

For the texture I used polygon identificaiton to make different parts of the mug a different colour and add the logo. I changed the specular level and glossiness of each ID to make the cup shiny.


On the bottom I added a ring to show where the mug had been worn over use.


I made a video of the render, changing from wire frame into the finished object.

http://www.youtube.com/watch?feature=player_embedded&v=C_JKxJa_0g0


Bumpy sphere


This sphere was a quick experiment with textures to learn a few new thing. On this sphere there is a gingerbread texture added, the specular level and glossiness are making it shiny and there is a bump texture.


Week 1 Sketches


In the first week I drew an observation sketch of a toy Panda and a toy Rhino. I also drew an imaginary sketch based on a song called "The Seven Sisters".

A sketch in 2B of 2 kinder egg toys.


A sketch inspired by the song "The Seven Sisters" by "Celldweller". I started the sketch in pencil and then inked it over with black pen.

The drawing contains a mysterious figure standing on a planet, in landscape is a representation on the northen lights, a representation of the stars of Orion as planets, the seven stars of the Plaedies as black stars and Saturn.

I finalised the picture by using different colured inks and pencils.


In photoshop I created a dark greyscale representation of the image.


Goblet


To create this goblet I first created a cylinder and extruded it into a cup. I then created a polygon on the base and used the extrude/bevel tools to create the handle. I used the turbosmooth effect to get a nice and smooth goblet. I finally inserted and mooved some edges to sharpen up parts of the handle.

Gingerbread Man


For this Gingerbread man I first imported the reference image to help create it. I then created a box in the center of it's body and edited the polygon by moving vertexes and extruding to create the Gingerbread Man shape. I finished the shape off with the turbosmooth modifier.

After creating the shape I then went on to create the different parts of the icing, using different shapes, the bend modifier and the turbosmooth modifier.


To create the textures on the gingerbread man I grabbed the gingerbread texture from google images and for the rest used solid colours. I changed the specular level and the glossiness on the icing to make it shiny. A UVW map was used on the gingerbread man to keep the bread texture consistent.

I also leanrt about bump texturing.


The texture effects are much more obvious on the final render:


Chess Pawn and Globlet


The chess pawn and the goblet were both taken in the same way. I drew a line mapping out one half of the object, then used the vertexes to edit the shape. For drawing the pawn I used a reference image in the front view for an accurate representation.

I used the lathe too which turns the vertexes into an object, then edited the position of the lathe until it looked right.


Robot


This robot was created in the first lesson in which we learnt about changing the shape of existing object, by working with polygons, vertexes and edges.

We learnt how to move different parts of the object, as well as how to scale and rotate. We also used the extrude and bevel tools to creat the robot's head, arms and legs.

The symmetry tool was used in the centre of the robot to create it's left arm and leg. We also tried turbo smooth, however I didn't keep it because I didn't feel it suited the robot.


A few finished renders of the robot: