Sunday, 11 May 2014

Character Avatar & Other Work


Linked the the refectory project, we then had to create a humanoid character avatar. I chose to make myself.

We need to create a Diffuse and Normal map, as well as have the character rigged for animation.

This involved creating a Diffuse texture in photoshop, from reference images of myself. Building the low polygon avatar also using myself as reference, sculpting the high poly avatar in Mudbox, and rigging the Character in Maya for animation and testing the rig in unity.

Here is the low polygon version of the model, I put in some close up shots of the face to see the topology. It took me a while to get to this point. Later on I added in eyes as a separate mesh.


After creating the low polygon model (actually quite a bit later in the project) I created the diffuse texture. This was difficult, and after a while I got a result, how I don't think it looked too good, and I should have spent some more time on it, especially the face.
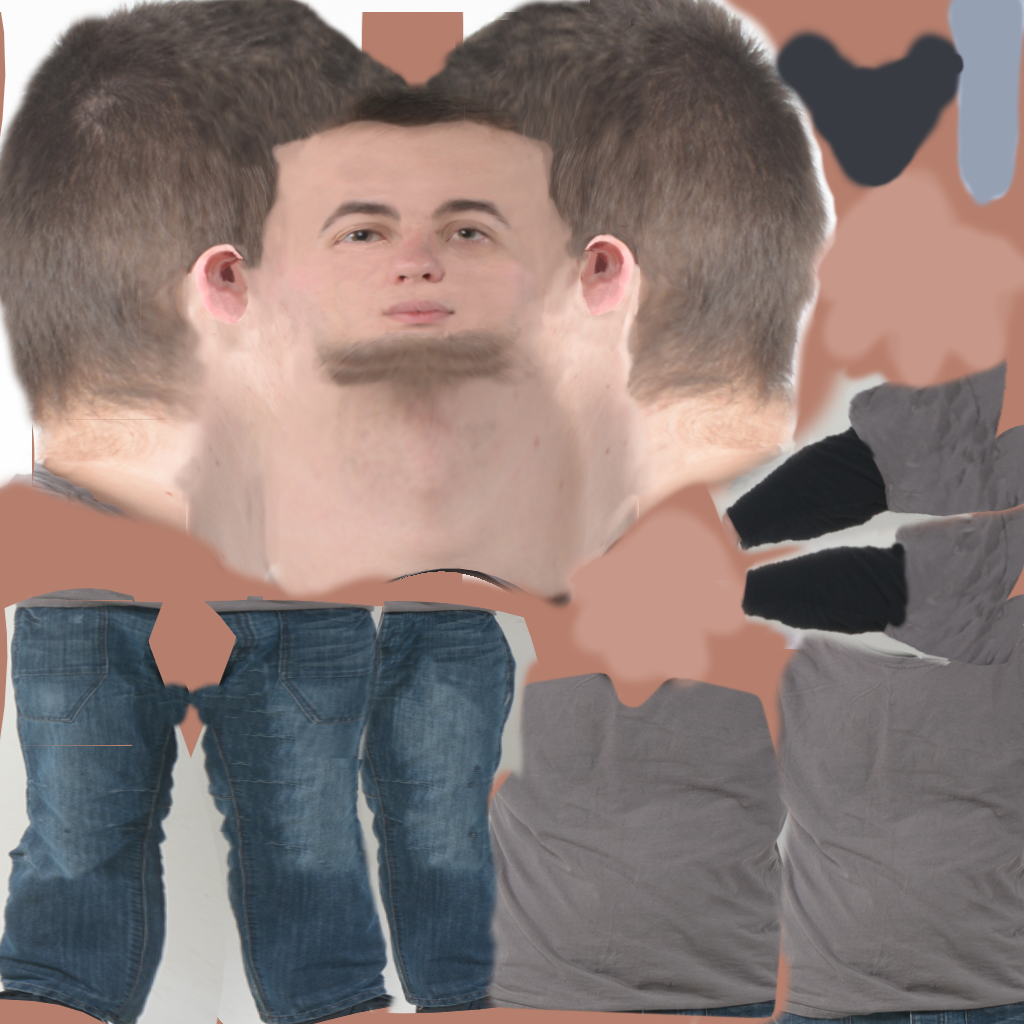

This diffuse includes the AO map, which made some parts of the face look a little strange.


I also created this texture on the eye from an online image to get a quick result.


Here is the AO map standalone.


Tanguy helped me get the folds of the t-shirt right in the sculpt, he encouraged me to do a sketch first which really helped.


After I spent a while tweaking it and working towards it I got a result I liked, it isn't perfect but I feel it works well, there is some nice sharp detail and the mesh does look interesting, even if some parts of the sculpt are a bit rough.


Here is the finished normal map, there was a bit of cleaning up I needed to do in photoshop, though not too much.


Another part of the project was rigging. I spent most time on this setting up the bones. After those were set up I simply added a heat map and slightly tweaked the vertex weights, the rig was rough but it was functional. At this point of the project we were running out of time so I took the quick route.


Unfortunately I lost my copy of the Unity rig file, so I couldn't upload a screen shot of it, the folder seemed to be empty in all backups, so something must have gone wrong. The rig was decent however with big movements, like moving the arms above or below 45 degrees, there was some clipping and strange deforming.

The final render I was happy with, I could have done a lot better but for a first character I feel it went well, especially with how quickly I did a few of he steps because of time.

I think better time management on this project, leaving room to iron out some bugs in the maps and work on the diffuse some more would have made the final result a lot nicer.


Aside from our main projects, we also had a few lessons with Robin where we learned other things.

We learnt the basics of Zbrush, how to get around some of the interface, however I unfortunately do not have any screens of this.

We were also at one time on the way to practicing dDo and nDo, however we didn't make it in the end, I think we decided that it was a complex way to start, so went went through nDo and how it works and left it there. I learned a few Maya tools in unwrapping that have been useful since, it was just a tick box, but sometimes that is just what you need.

We were given a plane with no UVs.


I got to the point where I had most of the plane unwrapped, and all texture space was even.


 The "Keep Image Width/Height Ratio" check box was very useful as it avoided having to scale any UVs whenever they were created.


I created this in nDo for some practice when we were going through the basics. Overall I found the programs quite easy to use.


One cool things we did was learn to use the Maya 2014 quad draw feature. We seemed to get to grips with it quite quickly as it was a very easy feature to use, however I also discovered some places where it can get confused and struggle, this gave me a further idea of how to treat topology as I am using it and with models in general.

(WIP screen?)


Saturday, 10 May 2014

Refectory Project - Game Design


Now for my favourite part, the game and environment design. Being the lead designer I came up with the majority of ideas in the design document, however also very much enjoyed working with other people to design and flesh out some of the ideas, this was perhaps my favourite part because I learned from them in the process.

Here are a few of sketches and notes that I made throughout the design process. I did not scan all of these in as a lot of it can be seen in the design document.


Below is a design document of all the different ideas and environment designs that we came up with, I will list other people's name wherever I remember being helped.

The main idea of our version of the refectory was to create an environment that people knew, they would be able to do all the things they usually would there, such as play pool, but to then go beyond that and put things in through environment interactions and mini games that they would not usually be able to do, such as through things around the room, play hide and seek, or play basket ball with the recycle bins.

Here is a link to a PDF of the game design document, also found on the submission disc.
https://googledrive.com/host/0Bzo0UfEzLxYedjVDcnpNbkNxSVE/GameInteractions.pdf

Overall I did surprise myself with the amount that got designed ready for the game, and how it would all fit together. It was just a shame that, just as with the sounds, most of it did not end up in the final build. The main difference between this and the sounds is that I feel like this was very worth while practice, I developed skills, learned from others and pushed myself into thinking of many different ideas and thinking of how it would all make the player feel. When I later created the design document from all my notes and sketches, Martin outlined what kind of things I should think about and include, which helped me think even further.

One thing to learn from is what would have been difficult and easy to do, a lot ideas here are ambitious, especially the mini games. A few would have been quite easy to do, and some of the interactions would not mostly likely not have been difficult at all, however as we ran out of time most of these were left out.

Refectory Project - Sound & Code


This was a completely new area for me, I have never done sound design for anything before and I can't completely remember how I got round to doing it. I think we just decided that some sound would bring the whole thing to life.

I enjoyed doing the sound, and was apparently very good at it, however it is not something I want to specialize in, nor can I picture myself doing it for any extended period of time, however the fact is I designed some sounds.

I went about this by first considering what sounds we needed, most of which I got and did not have to go back and obtain later on.

I made a list of any sounds we needed and decided that whatever sounds I was gathering, I both should and would need to edit them. For this task I downloaded Audacity, which conveniently had a portable version which I could load directly from my hard drive.

(sound list?)

To gather any initial sounds I needed I started with the internet, which after searching round I discovered that http://www.freesound.org/ was the best resource. Barely anything on there you can use in its raw form, however after editing and combining sounds you can reach the result you are looking for.

http://www.freesound.org/
 
 
Please see sounds on submission disc

As good as this website was, there was a limit to what I could obtain, so some of the sounds I needed to record myself. I used a Roland Recorder which I borrowed from the university stored to get any sounds I needed. The most fun I had with this was recording my own "effort sounds" for the character.

Please see sounds on submission disc

Next came the most time consuming part of the task, which was editing and producing the sounds. I did all sorts of things, such as chopping sounds up, layering them, changing the speed, pitch, adding effects, editing the volume and more.


Some sounds were very easy to create, it could be a case of cutting and layering a few sounds to obtain just what you are looking for. However other sounds were a huge pain, it took a long time to get them right, which sometimes involved very small tweaks, or creating something to scrap it and start something new. This really tested my patience but I eventually managed to get a result where I needed to, there did have to some times where even though a sound wasn't exactly what we wanted I had to call quits on it and move on.


The final pool of sounds I am very happy with, some could have been better but I feel like I tackled the time quite well. The skills I learned haven't completely gone to waste as I used them when designing sounds for Flood Rush, though on a personal level there isn't too much of a benefit to me, which I feel was the biggest down fall of tackling this area.


I also feel it is a shame that a lot of the sounds were left out of the final build, there unfortunately wasn't time to put them all in and code triggers for them, but I still have all the sounds, and it is clear to here what they were intended for.

I worked on part of the process of putting the sounds in to the scene.

I created a unity scene with speakers rigged up to music in order to test and demonstrate 3D sound, I also tried to play a sound when pushing a box, however I think I was told not to worry, so did not finish coding it.
https://googledrive.com/host/0Bzo0UfEzLxYea0F3V2VlbnNhWWs/TieIn.html The build is also on the submission disk.

I also coded the walking and running footsteps, and the jump and land effort sounds to work with the character controller. I had some help from Ricardo making sure the right sound played when landing, depending on if you were pressing the sprint button. I found this quite challenging and very rewarding. It was interesting because Ricardo introduced me to a logic system which I then needed to get my head round and use it how I needed.

https://googledrive.com/host/0Bzo0UfEzLxYedmRZSHhZRnFTbWs/Coding.html
The build is also on the submission disk

Refectory Project - Asset Creation


For the project I made quite a few assets, roughly 14. A few of them were very easy and were literally a cube with the correct measurements, others actually needed to be modeled. 

The majority of these I modeled to the correct measurements and then passed on to be textured, however with the exception of the Recycle/Food bin which Ricardo did some finishing touches with (however from what I remember the screenshot here is before I handed it to him), the other exception is one of the plugs, which I textured myself.

Z1 - Bin Side Attachment


 Z1 - Kenco Coffee Machine


Z1 - Vending Machine, used for both food and drink machines


Z1 - Water Machine


Z2 - Food & Recycling Bin (Which Ricardo later took to tweak)


Z2 - Rubbish/Recycling Bin Closed


Z2 - Rubbish/Recycling Bin Open


Z3 - White Pool Ball


Z3 - Pool Chalk


Z3 - Pool Cue


 Z4 - DJ Desk


 Z4 - On Stage Speakers


Z4  - Microphone Stand


Z4 - Hanging Speakers


Z4 - Stage Walls & Sound Desk


Z4 - Stage


Z4 - Stage Steps


 Z1 - Corner Plug

These plug I textured myself, this was more challenging the I expected because the images needed a lot of editing in Photoshop, however it was not too difficult.


 I feel overall these went quite well, for the time I spent on them and considering they needed to be low poly. The topology was mostly fine, apart from the bin the Ricardo tweaked. 

I feel it was a good idea to pass these on to other people to texture, as there are people who are both better and fast than I am.

Overall building these was not too difficult of a task, I just needed to make sure they were the correct size for the scene and followed an accurate shape to the real object, without creating bad topology. After adapting to 3DSMax again I enjoyed this, I did not feel it was a big challenge, but still good practice and it was good having a work flow with other people.

Refectory Project - Measurements


As mentioned previously, I took and distributed measurements of many of the assets in the refectory, including having help from others with more difficult things to measure, such as the stage.

Below you can see how I made notes of the different measurements, it does look untidy but I just needed to get them down. I kept everything consistent with what would be the Width and Length, generally the front to back of a chair was the length, and from either side the width.


There was the occasion where I did a small sketch to making everything more clear.

I then put the measurements up on Trello for people to quickly start modelling accurately.


I would put any necessary information that the modeller would need in order to get a clearer idea of how the measurements work.


Refectory Project Introduction


As a class we were tasked with recreating the student union refectory, during this time I took on many different roles and did a wide variety of tasks.

We each had our own roles, my main focus for the project was game design, designing interactivity and any mini games that might be played. However this role did not necessarily require as much time as other rules, so of course I made myself useful by working in other areas as well.

I also worked on sounds for the environment, took and distributed measurements of many assets, created assets, and coded some of the sounds into the game.

I had some help from people as I was working on different things, which of course is part of working as a group, some of this is outlined in the individual posts about the different areas I worked on.